Would it be better with a book template (i.e. the
step style pages used in the installation guide)
Configure The Crystal Web Service
Both Quick Reports and Operational Reports of type Crystal Reports could be previewed
and printed from both IFS Enterprise Explorer and IFS Web Client. Yet, there are
some configuration parts one would have to carry out before using this feature.
The following describes how you can install and setup the Crystal Report Web
Service.
Contents
Local system Administrator account should be used for all the below
configuration steps.
Prerequisites
- CRYSTL component must be included in the build.
- Dot Net runtime version 4 or later. You can download and install this from the
Microsoft download site, http://www.microsoft.com/download
- Java 1.5 or any certified java version should be installed. The path to
the Java bin folder should be available in the PATH
system environment variable. If
you install Java after installing IIS, then restarting the World Wide Web
Publishing service is required. In order for the Crystal Web Service
to access the Java installation directory, make sure that
execute access to the Java
installation directory is given to the
IIS_IUSR and
Authenticated users.
- Microsoft IIS.
- Install “IIS 6 Management
Compatibility” Role. Follow the steps given below to install it. Without
this the Crystal Web Service installation will not run properly.
- From Windows go to Start\Administrative Tools\Server Manage (This
example is with respect to Windows 2008)
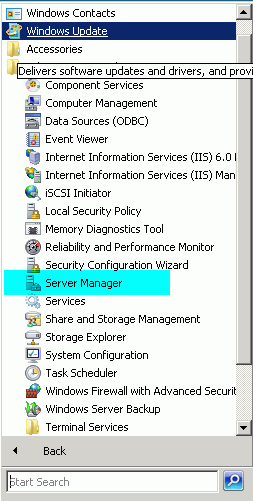
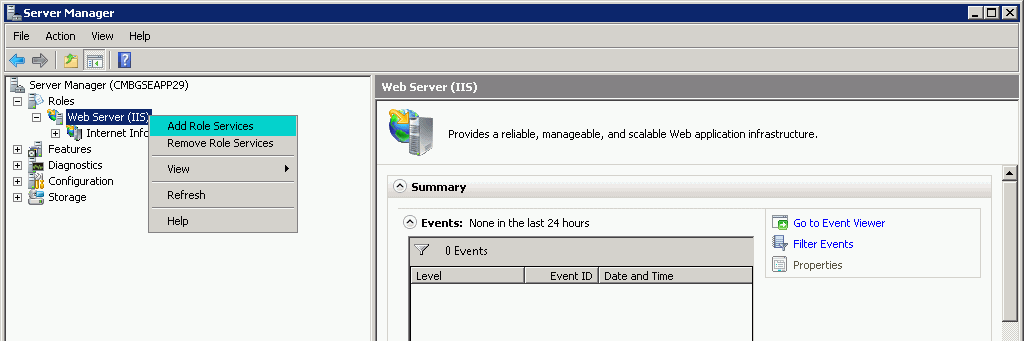
- On the left Navigation tree go to Server Manager\Roles\Web
Server (IIS) and select "Add Role Service"
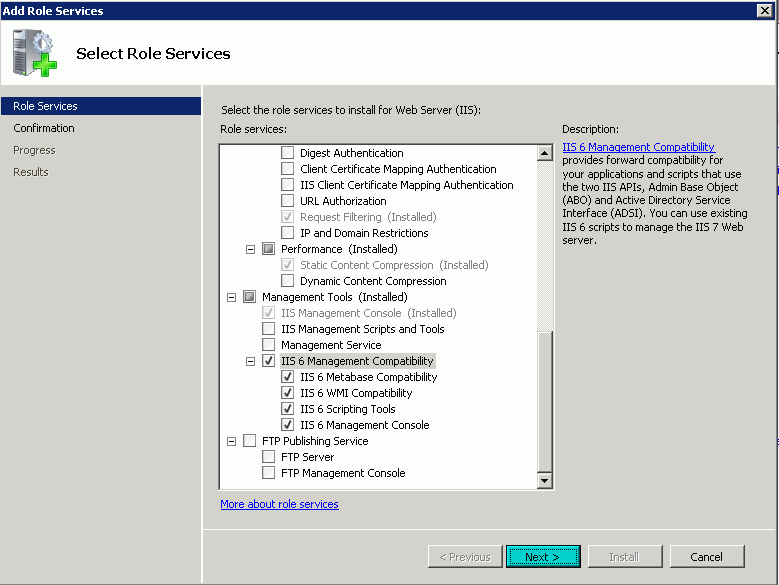
- On the "Select Role Services" pane, scroll down to "IIS 6
Management Compatibility". Select the all check boxes underneath the
node.
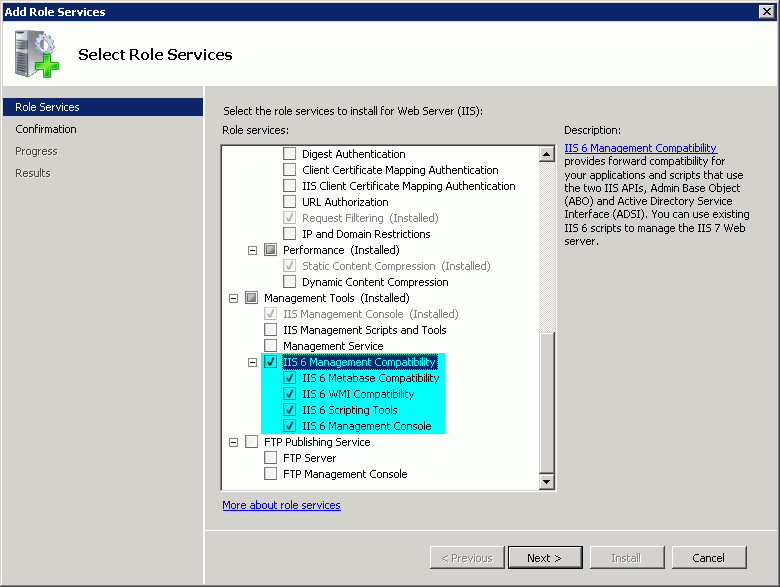
- Click "Next" from the "Select Role Services" pane, and then click
"Install" at the "Confirm Installations Selections" pane.
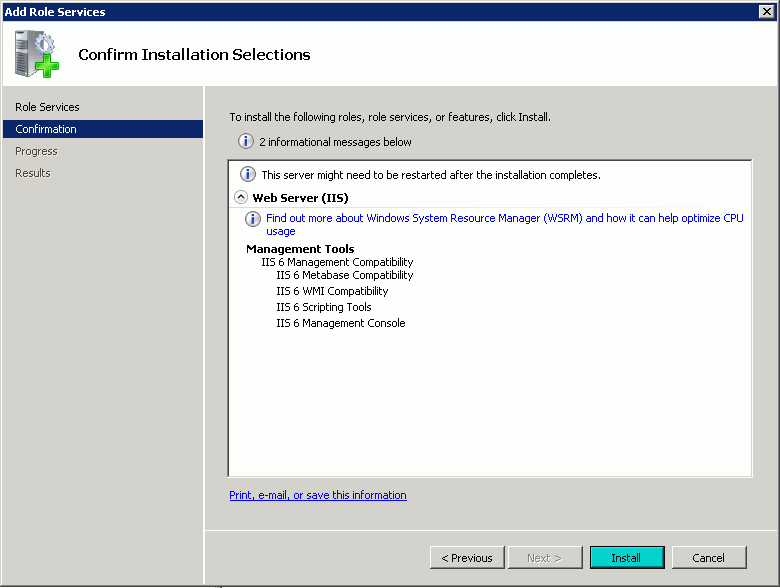
- After the installation finishes successfully
click “Close” to leave the “Add Role Services” wizard.
- Oracle Runtime Client needs to be installed. The client
runtime of Oracle version 11G Release
2 (11.2) or any later certified Oracle version should be installed. When
installing keep in mind that the Oracle Client Runtime and the Crystal Dot
Net runtime files you install in step 8 should be of the same bit version.
Both should be either 64 bit or 32 bit. Having mixed versions will cause
database connect issues. An entry matching the Oracle TNS entry specified under
<ORACLE_TNS> tag found in ifs-crystal-config.xml in
the Web Service installation folder needs to configured in to the
tnsname.ora file. You will find this ifs-crystal-config.xml file
after you install the Crystal Web Service. For example
C:\Inetpub\wwwroot\IFSCRWebSetup.
- After installing the Oracle Runtime Client make sure that that line
SQLNET.AUTHENTICATION_SERVICES= (NTS) in <ORACLE_HOME>\network\admin\sqlnet.ora
file is commented.
# SQLNET.AUTHENTICATION_SERVICES= (NTS)
- Install Crystal Dot Net runtime files. Locate the Crystal Merge Module which
contains the Crystal Dot Net runtime files required to run the Web Service
at <ifs_home>\instance\<instance_name>\CrystalWebService_xbit_<instance_name>.zip
select the correct zip according to the architecture of the web-service host .
Unzip and locate the correct mis file and install.
eg:32bit CRRuntime_32bit_13_0_1.msi eg:64bit CRRuntime_64bit_13_0_1.msi
-
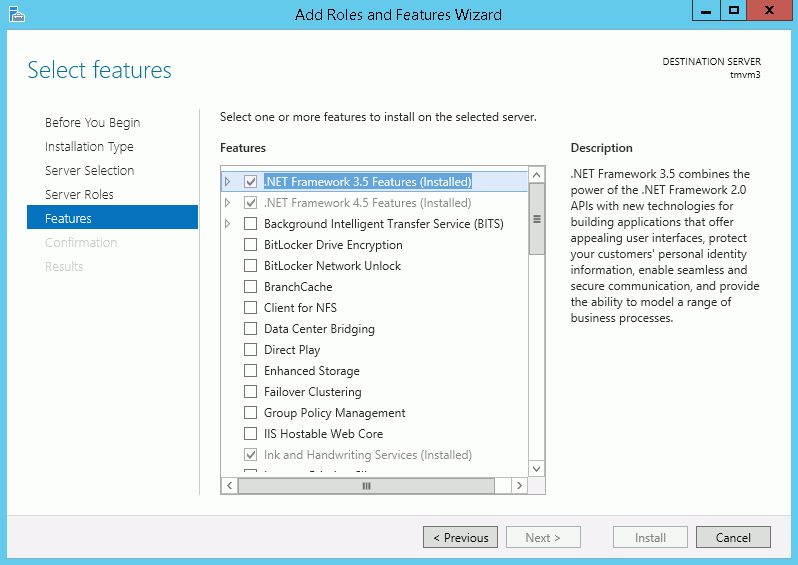
When in a WindowsServer 2012 with .NET 4.5, the ASP.NET v4.5
should be enabled by following the below steps.
Go to
Server Manager > Add Roles and Features
Wizard.
Make sure to check on .NET 3.5 and 4.5 features under
Features.
Then install it.
If all prerequisites are met, follow the steps below to install and configure
the Crystal Web Service.
- Create a folder in the machine where the Crystal Web Service is going to
be installed and copy the Crystal Report files that are going to be
previewed from IFS Enterprise Explorer to this folder. This folder will be referred to as the
OpenReportPath later on in the installation process. If the reports
are Info Services Reports make a folder by the ordering language inside the
"OpenReportPath" folder and copy the files in to that languge folder. For
example, if one is are going to order Info Service reports with "en"
language then create a folder called "en" inside the "OpenReportPath" folder
and copy the Info Service layout of type Crystal in to the "en" folder.
- From the Application Server locate the CrystalWebService_<instance_name>.zip
file found at <ifs_home>\instance\<instance_name> where <instance_name>
is the name of the Extended Server instance. Unpack it into a folder on the
same or a different machine to install the Crystal Web Service. Run the setup.exe
to install the Web Service.
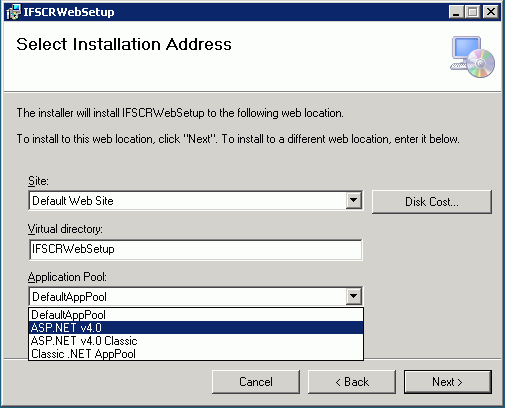
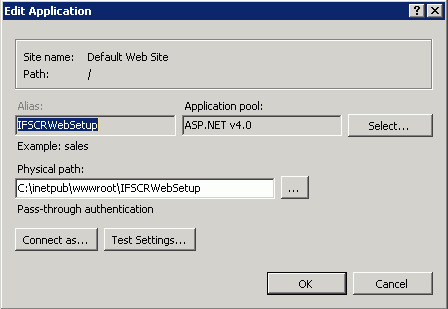
- Select Default Web Site as the Site, enter a
new name for the Virtual Directory or leave the default value as
it is and select the Application Pool as ASP.NET v4.0 like in
this example (or any the available latest version), click Next to start the installation.
(If any of the recommended versions of .NET is unavailable, install\reinstall Dot Net and restart
the setup )
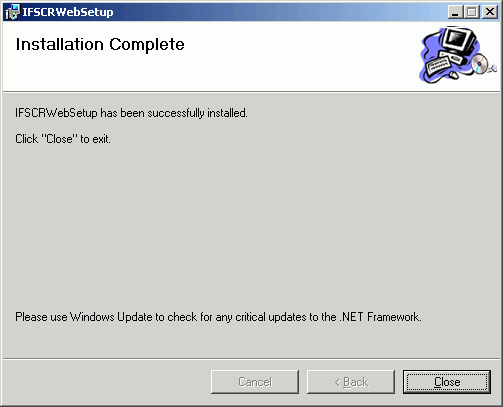
- The following is shown if the installation is successful.
- After successfully installing the web service, browse to the
virtual directory folder in wwwroot of IIS (e.g.
C:\Inetpub\wwwroot\<Virtual Directory>) and open the Web.Config
file from a text editor. Specify the folder where the Crystal Reports are
stored under the key OpenReportPath. This is the same folder that
was referred to as the OpenReportPath at the beginning of this
installation process.
For example,
<appSettings>
   <add key="OpenReportPath" value="C:\reports\Test Reports\CXI"/>
</appSettings>
- Browse to <OS folder>\Microsoft.NET\Framework\v4.0.xxxx\CONFIG
folder (e.g. C:\WINDOWS\Microsoft.NET\Framework\v4.0.30319\CONFIG)
and open the machine.config file from a text editor. Under the
<configuration>\<system.web> section, comment the following line
<processModel autoConfig="true"/>
and insert the following line,
<processModel enable="true" userName="SYSTEM" password="AutoGenerate" />
- From the IIS, Check the Basic settings for the Virtual
Directory , Make sure its running on ASP .NET v4.0 Application Pool.
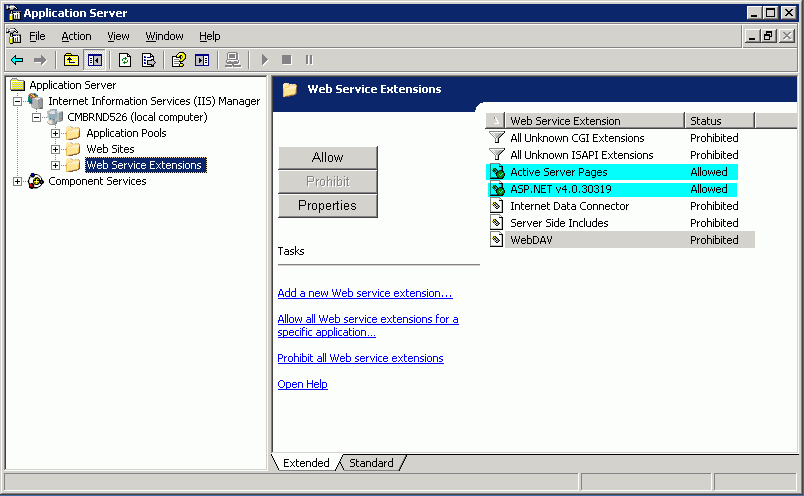
- In IIS version 6 the Dot Net Web Service Extensions are
Prohibited by default. Make sure these Web Service Extensions are
Allowed in the environment where the Crystal Web Service is installed.
To allow these extensions, from the IIS Manager, go to Web Service
Extensions. From the right hand side panel make sure that the,
Active Server Pages and ASP .NET v.4.0.xxxxx Web Service
Extension status are set to Allowed. If not, select these two
extensions and click the Allow button to (or select Allow
from the RMB menu) change the status to Allowed.
Do the following in order to enable
Web Service Extension in
IIS version 7. Please note that this example is based to Windows 2008
and IIS 7.
- From Windows go to Start\Administrative Tools\Server Manage.
- On the left Navigation tree go to Server Manager\Roles\Web Server
(IIS) and select "Add Role Service".
- On the "Select Role Services" pane, scroll down to "Application
Development" and select “ASP .NET” and ”ASP” check boxes. You will be
prompt to add some other required features in order for ASP .NET to run
properly. Select “Add Required Role Services”.
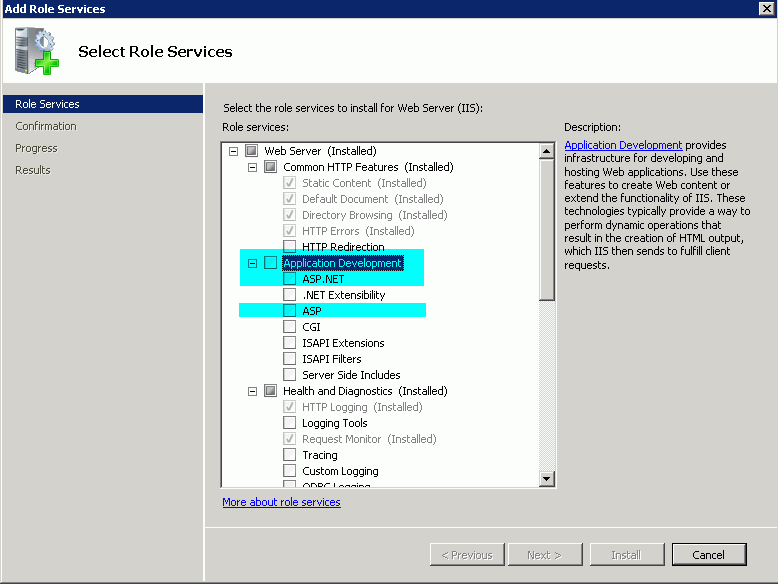

- The final selection will look like below.
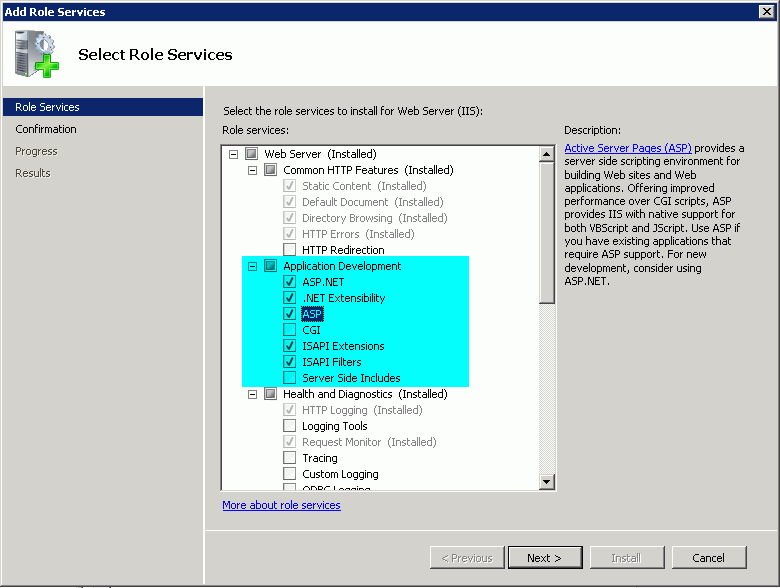
- Click Next from the "Select Role Services" pane,
and then click "Install" at the "Confirm Installations Selections" pane.
- After the installation finishes successfully click “Close” to leave
the “Add Role Services” wizard.
- The "Anonymous Authentication" for the corresponding virtual
directory should be enabled.
- Restart the machine which has the Crystal Web Service
installed.
One needs to configure some System Parameters in order for IFS to communicate with the Crystal Web Service. Namely these System
Parameters are,
| System Parameter Name |
Description |
Example |
| The machine name where the Crystal Web Service is installed |
The machine name to be used when accessing Crystal Web Service is
installed. The default value is *. |
CMBGSEAPP4 |
| The protocol of the Web Server where the Crystal Web Service
is running |
The protocol to be used when accessing the Crystal Web Service. Normally
this is the IIS default protocol. The default value is http. |
http |
| The IIS port for the above mentioned Web Server |
The port to be used when accessing the Crystal Web Service. Normally
this is the IIS default port. The default value is 80. |
80 |
| The Virtual Directory name given to the Crystal Web Service
in IIS |
The Virtual Directory name be used when accessing the Crystal Web
Service. This is the name one would specify when installing the Crystal Web
Service. The default value is IFSCRWebSetup. |
IFSCRWebSetup |
| Specify if web database access security check is required |
Specify if web database access security check is required when
previewing/printing Quick Reports. The default value is 'NO'. |
NO |
Note: If you set YES to web database
access security system parameter then you need to add the CR_WEB_INIT procedure in the
CRYSTAL_WEB_UTIL_API package to your Crystal layout. Check the
developer guide lines on how to
add the CR_WEB_INIT procedure
to a layout.
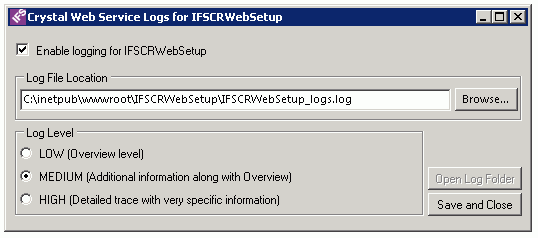
- After Crystal Web Service version 90.00.0001 release, the Crystal Web
Service Instances can be configured to write logs in different levels. The
CR_Web_Log.exe which can be found in the Web Service instance folder could
be used to configure logs for that particular instance. Once the logs are
configured, you should make sure that the Windows security group IIS_IUSR
has read, write and modify access the logging folder that you specify under
"Log File Location".
- If
you perform multiple report requests to the same crystal web service
simultaneously, you can get the Error in retrieving the saved PDF report from
Crystal Web Service exception. This limitation is due to an error in Crystal Runtime.
This has been reported to the crystal runtime vendor. The issue is
addressed by the LCS bug
104424.
- Users may identify a performance issue with delaying a report from rendering
through the Crystal Web Service, when it has some active long-running
requests. This occurs since the Crystal runtime is limited for 3 CPLs
(Concurrent Processing License) where it limits only three report requests
to be processed at once, and a Maximum of 75 Jobs where each of the
integrated resources in the report like the main reports, subreports, and
in-session report objects (e.g.; drill down, paging, searching, and more.)
consumes a "crystal job". In a production environment, the above limitations
could rarely happen.
Related knowledge based articles :
CPLs,
Job Processing Limit