
Manage Event Actions is about setting up which actions to perform when Events are triggered in IFS Applications. The Events are predefined in the system. The action can be for example to send a mail when an order is released for a specific customer.
Read more about concept Events.
The Manage Event Actions form is the starting point when managing event actions. The most common tasks are available as short links on this page for example Create Event Action and List Event Actions.
From this start page you can easily find and navigate to existing Event Actions. Type the initial letters of the Event in Find Event Action followed by <Ctrl>-K. Once the Event Action is shown in the field press the navigate button to the right and the Event Action including detail information is shown in the Event Action form. To edit the default date and time formats for event actions click on the Default Time and Date Formats link and modify the format values in the dialog box.
New event Actions are created in the New Event Action form. You can do that by simply clicking on Create New Event Action in the start page or in the start menu navigator in folder Solution Manager/Integration/Events or you can list the Event or Event Actions and right-click on one selected Event and invoke Create New Action for Event.
Action Type and Perform upon Event are mandatory. Besides that the Event Actions functionality must be turned on (this you can see in the Event Actions start page) and that IFS Connect must be configured to handle events each event action can be turned on and off. The event action must thus be enabled in order to be performed. When the Event action is enabled the Event is also enabled.

There are different kinds of actions that can be performed when an event is triggered. For each event you can set up several actions of different types. The action can be E-Mail, Execute Online SQL, Application Message, Task, Start Workflow or Streams Message. These action types are described in the table below.
| Action | Description |
|---|---|
|
|
Send a mail to receiver. Event Registry's action email use method mail
in Parameters:
|
|
Execute Online SQL |
Execute the SQL-statement in the dialog. The statement will be
executed in the current database. The statement is executed online
without involving any executor of actions. Parameters:
|
|
Application Message |
Creates an Application Message that is sent to Connect.
All the information available in the Event is included in the message. No
formatting of a specific text is available here; it is all handled by Connect.
It is though possible to set Connector, Address Data, Envelope
and Transformer. If Connector is specified Address Data is
mandatory. If Connector is not specified the message will be routed by Connect.
This event action is not possible to subscribe to.
Parameters:
|
| Task |
Creates a Task to one or many users visible in IFS Enterprise Explorer.
Parameters:
|
| Start Workflow |
Calls an external web service. The intention is to be able to call a workflow engine that expose web services to start a new instance of a defined workflow. Parameters:
|
| Streams Message |
Creates a new stream message Parameters:
|
Allow Subscription indicates that this action is available for subscription by end users. You can limit the possibility to subscribe to the action by entering a required permission set. Only users that are granted this permission set can then subscribe to the event action.
If an end user subscribes to an action, this means that the action handler sends this action to the subscribers as well as to the original receiver, stated in the action itself. It is not necessary to state a specific receiver if the action is especially designed for subscription. The only action possible to subscribe is E-Mail.
To be able to control the execution of the action you can enter a number of conditions that must be fulfilled. The action is thus only performed if all conditions are met. Click Edit... to edit the condition for the event action.
To create an action that contains useful information about the event it is possible to enter substitution fields into the message or subject. There are two types of substitution fields, Event and General.
Each event supplies a number of substitution fields with valuable information about the specific event. Select the substitution field and drag it into the message and place it where appropriate. The substitution field will automatically get prefixed "&" to mark it as a substitution field that will be replaced by real data.
The application provides a list of general Context Substitution Variables. These are not related to the actual event but can be useful to include in the message. A context substitution field can for example be the current users email address. Select the substitution field and drag it into the message and place it where appropriate. The substitution field will automatically get a pre- and postfix "#" marker to mark it as a context substitution variable substitution field that will be replaced by real data.
For email event actions you can add one or more files as attachments. Click on the button next to the Attached Files field to open a dialog where you can type the full path to the files that should be included. You can also in this dialog select option "Create and include file" and enter the text directly in the file contents field.
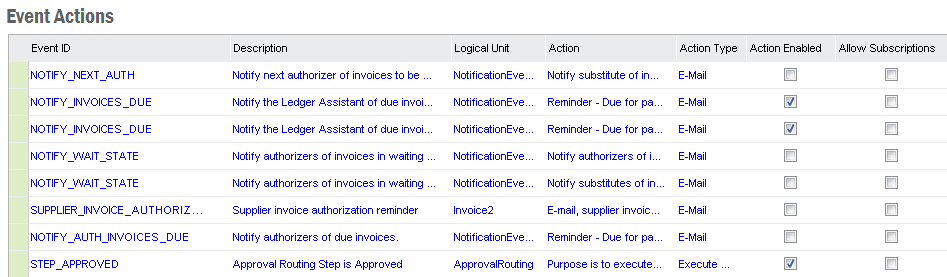
All event actions are shown in Event Actions in folder Solution Manager/Integration/Events.
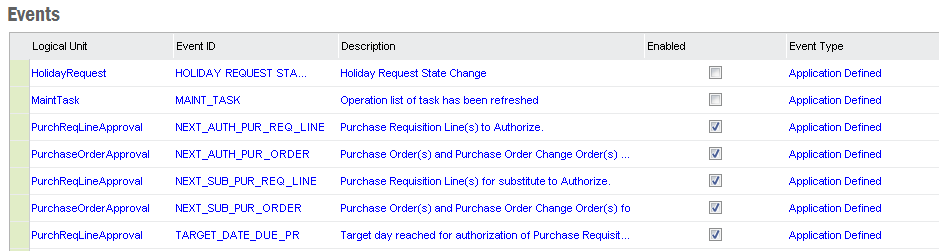
All Events are shown in Events in folder Solution Manager/Integration/Events to see all the events that is possible to create actions for.
The see the actions for an event right-click and select Show Actions. For
Custom Defined Events you can also select
Show Details in the same menu to view/edit the event.
Custom Defined Events are events that are defined in a specific installation. The difference between Custom Defined Events and Application Defined Events is that Application Defined Events is defined in the code by the programmer meanwhile Custom Defined Events is configured and executed by triggers. The triggers is only created when the event is enabled, in order to recreate the triggers you need to disable the event and then enable it again.
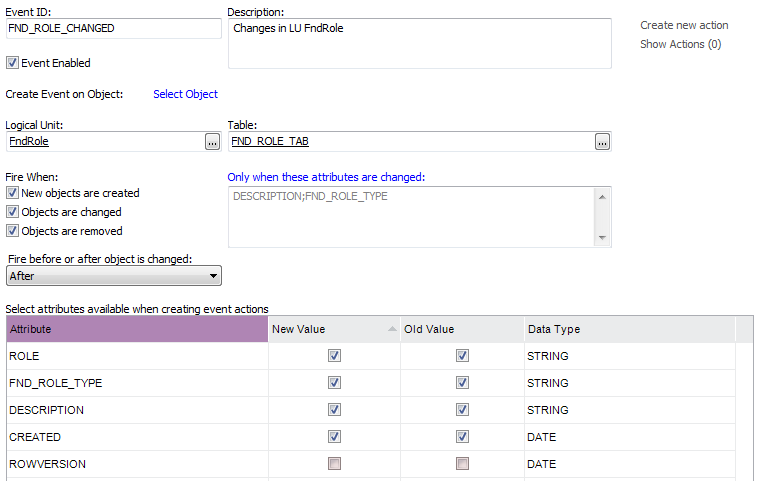
When you create a Custom Defined Event you select a Table on a Logical Unit that should handle the event. The event can be fired on three different occasions; New, Update and Remove.
There is also a choice of when the trigger should be executed; Before or After the object is changed. Before results in that the trigger will be executed before the business logic is executed. After means that the business logic will be executed first and the trigger will be fired afterwards.
Almost all attributes in the table are available to use in the Event Action
message. The only exceptions are LOB's and other special data types. In the attribute
list select which attributes that should be available when creating event actions
by checking the New Value and
Old Value. This creates variables called
NEW:<AttibuteName> for New Value
and OLD:<AttributeName> for Old Value,
for example "DESCRIPTION" and "NEW:DESCRIPTION" or "OLD:DESCRIPTION".
When the event is fired due to an object has changed the NEW:<AttibuteName>
is the variable for the new value after the transaction has occurred and OLD:<AttributeName>
is the variable for the old value before the transaction did take place. This is
how the variables get their value when event is firing:
NEW:<AttibuteName> and OLD:<AttributeName>
is the same value since no old values exists.NEW:<AttibuteName> is the new value after the transaction
and OLD:<AttributeName> is the old value before the transaction.NEW:<AttibuteName> and OLD:<AttributeName>
is the same value since no new value exists.Note: CLOB type columns are not supported in Events due to a limitation.
A Custom Defined Event can have Custom Defined Attributes. To enter a new attribute
right-click in the list of Custom Attributes and select
Insert. Enter a name for the parameter and
a PL/SQL function <Package name>.<Method>. The PL/SQL function can
use Attributes described above as arguments.
Note: It is not possible to use Context Substitution Variables
as arguments to Custom Attributes.
Fnd_User_API.Get_Description(#USER_ID#) is not allowed.
Example:
Fnd_Role_API.Get_Description(:NEW.ROLE)orFnd_Role_API.Get_Description(:OLD.ROLE)
Note: If a Custom Defined Parameter selects from the Custom
Defined Events table you will run into Oracle error 4091.
ORA-04091: table SCOTT.Emp_tab is mutating, trigger/function may not see it
A Custom Defined Event can be exported to the file system as a (*.ins) file. Right-Click in the Custom Defined Event detail form to open the context menu and select Export Custom Event. Set a filename for the export file and click on save to save the file. The Event can then be imported into another environment by executing the export file in the database.
Note: From security perspective, in order to be able to export a custom event, one should have admin privileges or should have been granted the database object 'Fnd_Event_API.Export__'.
Custom Events can also be exported using Application Configuration Packages.