| Foundation1 / Development Guide / Business Intelligence / Bi Analysis Package / |
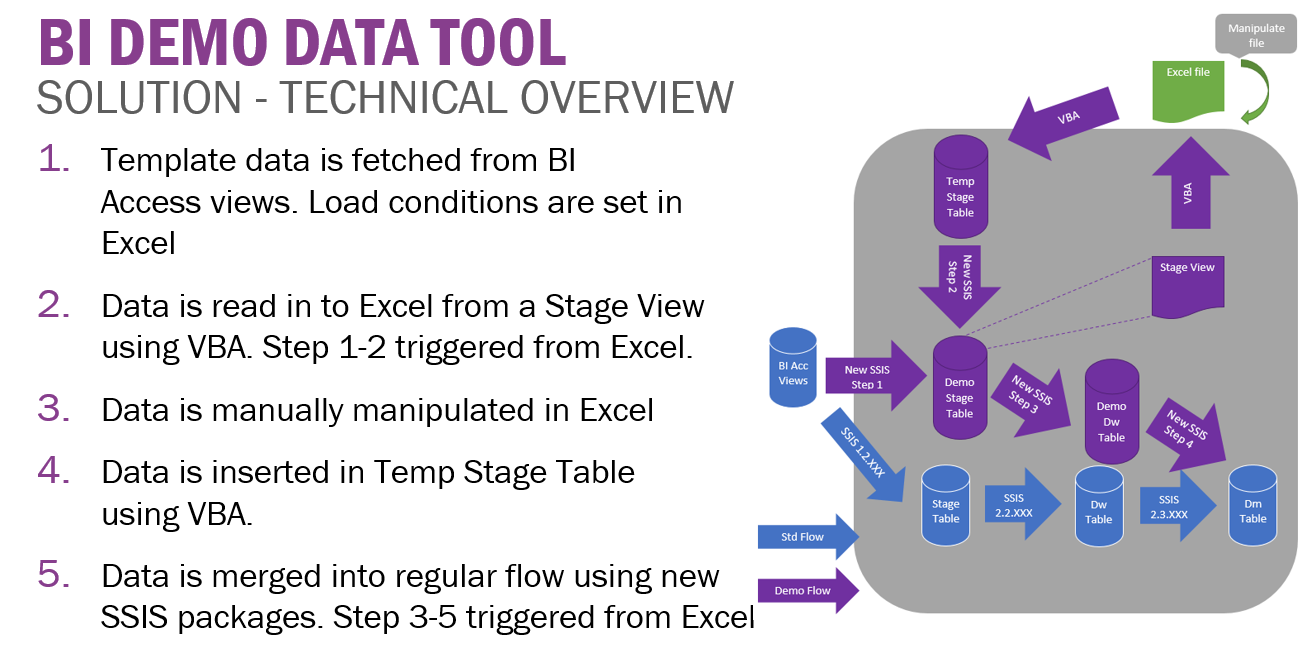
This document describes the different steps to follow when developing BI Demo Data Package components. The procedures involves steps in both Microsoft SSMS, SSIS and Excel 2013.
Development should be dome in SQLServer Data tools 2010 which is a part of Visual Studio 2010. The tools are installed together with SQL Server 2012.
It is also assumed that the developer has sufficient knowledge about Microsoft SSIS as well as basic VBA coding.
Excel files are to be developed in Excel2013
Note: All steps in this description are to be done for both SQLServer2012 and -2014 respectively.
Use component purcft as a template. Check
out from SVN.
Demo Data files are found in sub directory
BIDemoPackages, see below
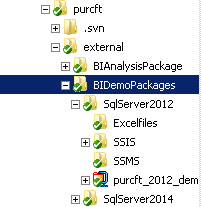
Create the same folder structure under BIDemoPackages. i.e. the folders
Make a copy of SSIS_purcft.sln file and
underlying SSIS folder and copy to directory
SSIS under BIDemoPackages
in your component. Rename to current component name.
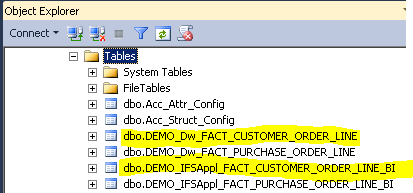
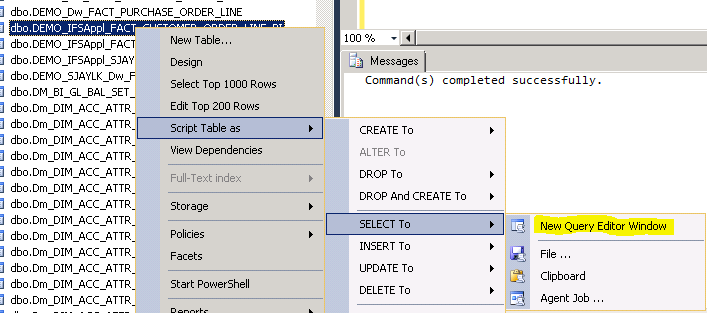
Script as CREATE to TABLE. Change name to DEMO_IFSAppl***_BI and DEMO_Dw***
Copy the Spreadsheet from purcft component
and put it in the Excelfiles folder.
Delete the headers in the DemoData tab.
Mark original IFSAppl_***_BI-table and select top 1000 rows in SQLServer. If the
table is empty run the original 1.2* SSIS package first.
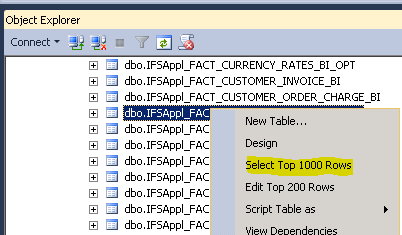
Copy all data into Excel spreadsheet including headers
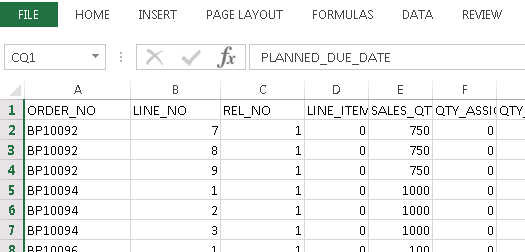
Remove all DIM_***_ID-cols in Excel spreadsheet as well as KEY-columns if existing. In this case ORDER_NO_KEY, LINE_NO_KEY, REL_NO-KEY.
Also remove OBJID and OBJVERSION columns. The idea is to have no redundant data in the Excel spreadsheet.
Format all date columns as Date generic dates. Choose locale according to the server settings. In the case English (United States).
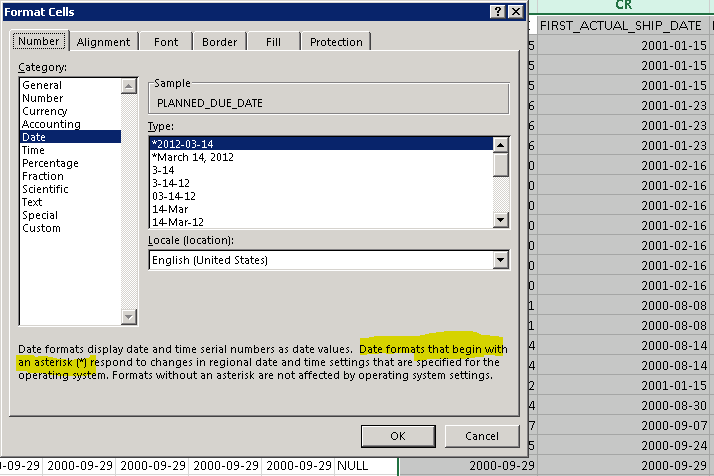
All other formats can be left as Generic.
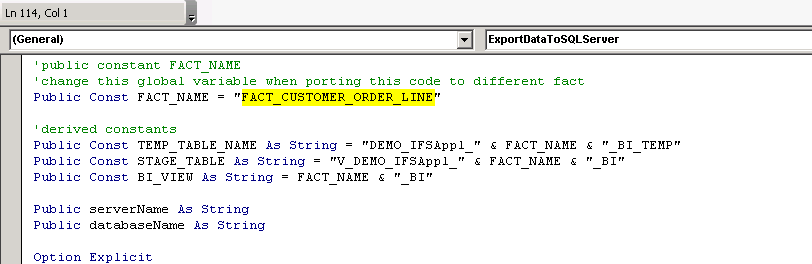
Open Macro ExportDataToSQLServer via Edit-button. Scroll to the top of the Macros to get to constants.
At the top,
change Public Const FACT_NAME to correct FACT_NAME:
Save the Excel file as Demo_FACT*****.xlsm in the Excelfiles folder
The View should have the same columns as the Excel spreadsheet.
To make it easy:
This way you get the SELECT
Add the following rows in the beginning of the file. Make sure to replace view name with
correct name.
USE [Pearl_App9_Bianapac_dev]
GO

SET QUOTED_IDENTIFIER ON
GO
CREATE VIEW [dbo].[V_DEMO_IFSAPPL_FACT_CUSTOMER_ORDER_LINE_BI]
AS
<SELECT statement from view script above>

GO
/****** Object: View [dbo].[V_DEMO_IFSAPPL_FACT_CUSTOMER_ORDER_LINE_BI] Script Date: 2014-09-18 14:01:22 ******/
SET ANSI_NULLS ON
GO
Edit the file and remove the same columns as you did in the Excel spreadsheet.
Execute the file and the view is created.
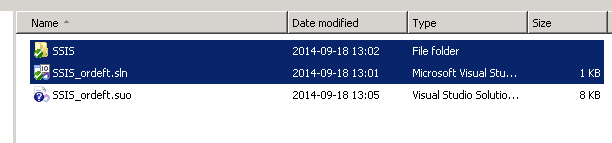
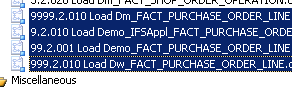
Open your SSIS solution, in this case SSIS_ordeft.sln
Rename solution to SSIS_DEMO_<component name>

Copy packages 9… from PURCFT component in the file system using windows explorer and paste into the SSIS project.
This package copies data from IFS Applications BI Access view into the Demo Stage table (DEMO_IFSAppl_FACT_****)
Open the 1.2 package in SSIS
Rename package to 9.XX Load Demo_IFSAppl_FACT……dtsx.
(Same pattern as in purcft component. Keep the number)
Modify IFSDW connection manager to point to correct DB.

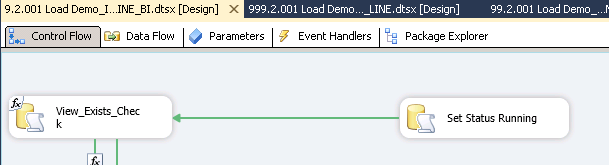
In control Flow:
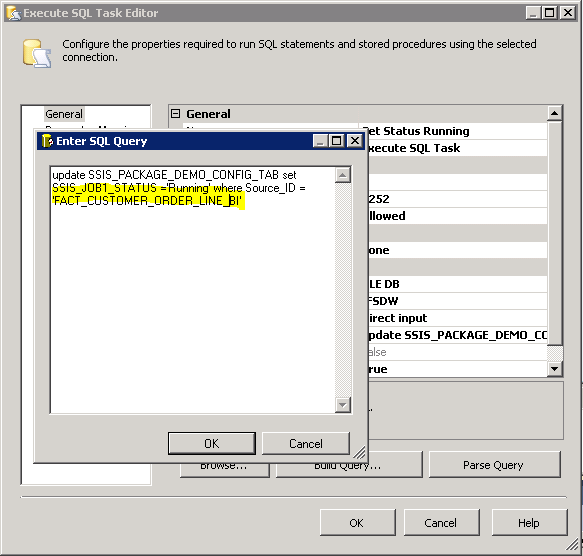
Copy component Set Status Running from purcft 9.2.* package.
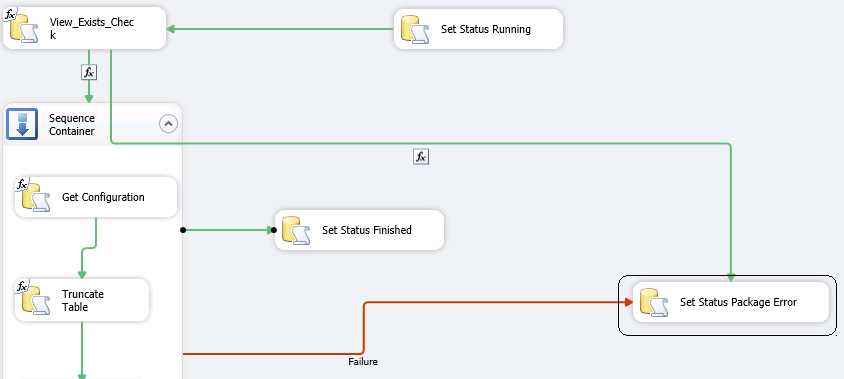
Insert into Control Flow, connect component to View_Exists_Check.
Change to correct table name in SQL Editor.
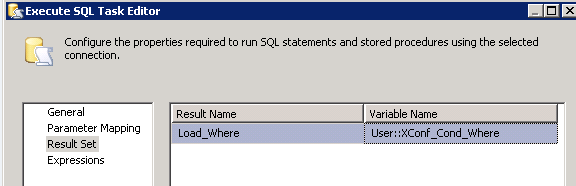
Right click Get configuration component – Choose Properties
In Properties – Expressions SqlStatement source, press the button and edit expression to get demo data load configurations:
![]()

"SELECT LOAD_WHERE FROM [SSIS_PACKAGE_DEMO_CONFIG] where [SOURCE_ID] = '" + @[User::Set_SqlSource] + "'"
Edit Get configuration Component, change Result Name to Load_Where:
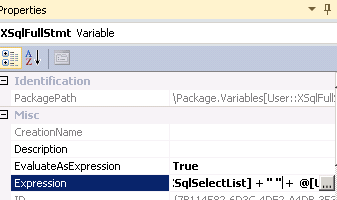
Go to Variables under SSIS in main header.
Change Set Destination to new DEMO-table.

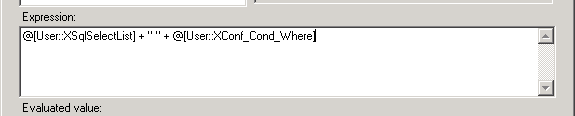
Edit Variable named XSqlFullStmt in properties window.
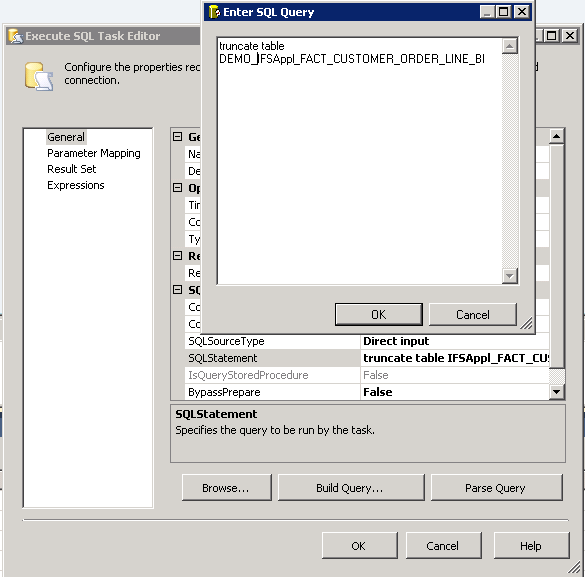
Open Truncate table component and check SQL Statement. Table name should be DEMO-table name:
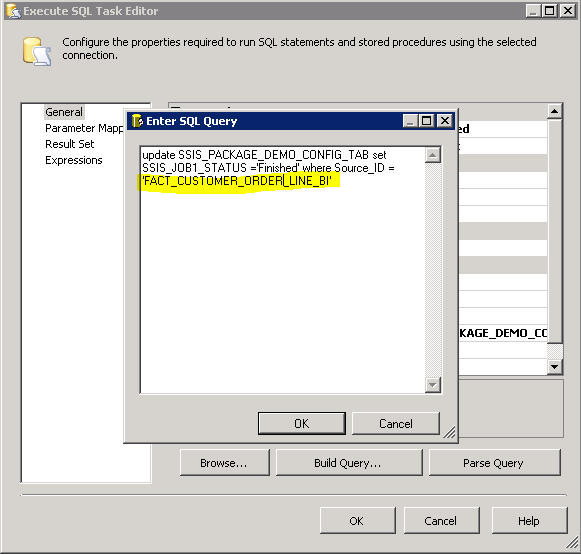
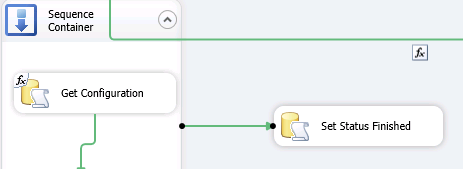
Copy component Set Status Finished from 9.2.* package. Enter correct table name in SQL editor.
Connect the package with Sequence Container.
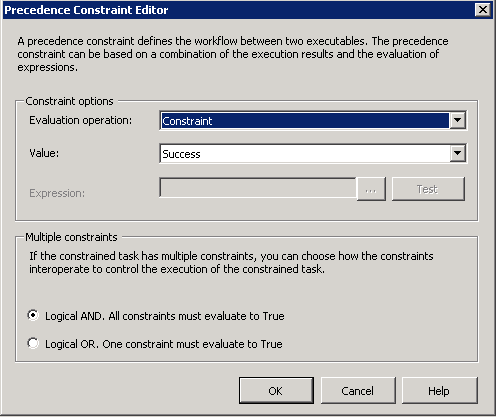
On connector between View_Exists_Check and Set Status Finished; add a Success condition:
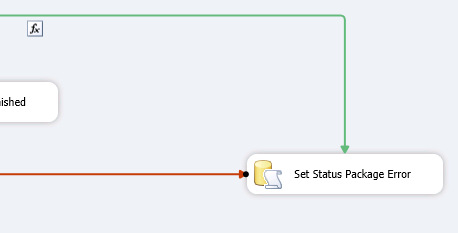
Copy component Set Status Package Error.
Connect with View_Exists_Check and Sequence Container.
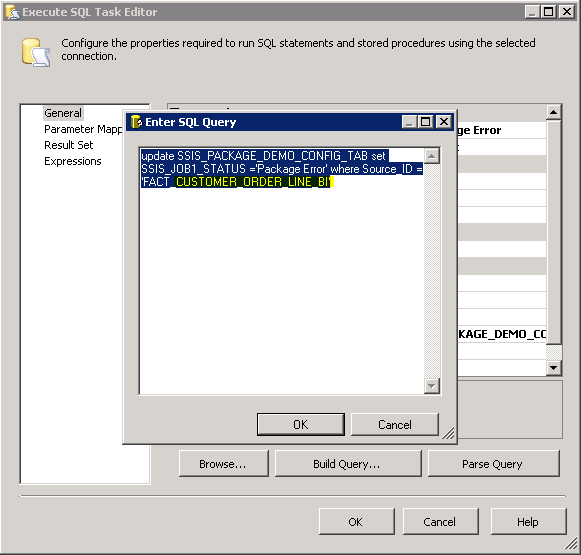
Edit Set Package Status Error with correct table name:
On the Connection between View_Exists_Check add an expression condition:
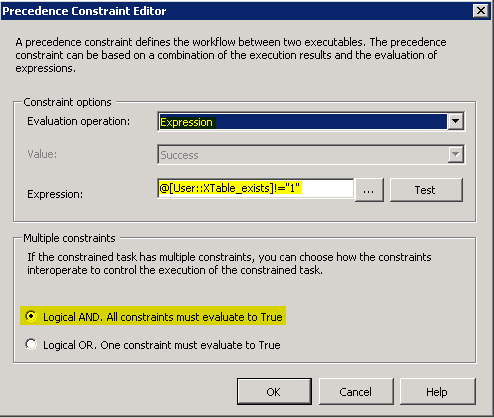
Expression is set to: @[User::XTable_exists]!="1"
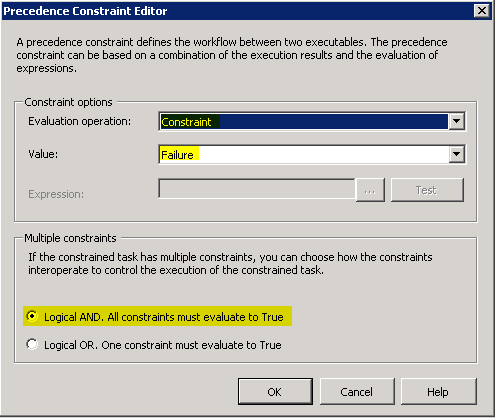
On other connector (Container to Set_Status_Finished) set Failure Condition:
Now one connector is green and one is red.
In Data Flow, open Destination component and check that all mappings are complete.
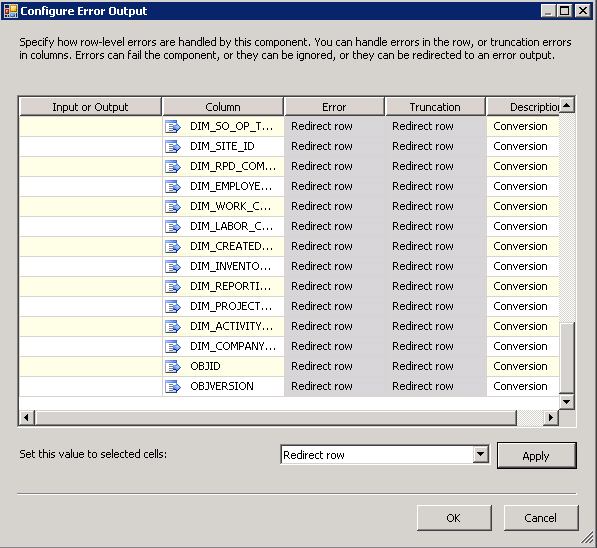
On Source component, check that Error output has Redirect row as value on all columns:
Insert configurations in Config table in SQLServer: (Change table names and
SSIS Job names)
INSERT INTO [dbo].[SSIS_PACKAGE_DEMO_CONFIG_TAB]
select 'FACT_CUSTOMER_ORDER_LINE_BI', 'FACT', 'Supply Chain', NULL, 'Demo_Cust_Order_Step1', ''Demo_Cust_Order_Step2', 'Finished', 'Finished'
Table definition below (as info)

Now run the package to fill the table and the view.
This package copies data from Temporary stage table, populated by Excel, to
the Demo Stage table.
Create the temporary table in SQLServer Management Studio using SQL command:
select * into
[dbo].[DEMO_IFSAppl_FACT_CUSTOMER_ORDER_LINE_BI_TEMP]
from [dbo].[V_DEMO_IFSAPPL_FACT_CUSTOMER_ORDER_LINE_BI]
Replace with correct table name in statement.
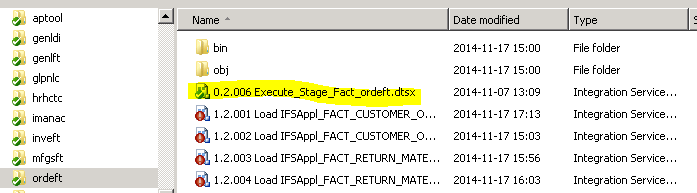
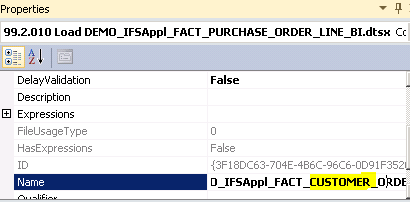
Open 99.2.010 Load Demo_FACT_PURCHASE_ORDER_LINE_BI.dtsx in the project.
Rename the package to reflect correct table name and number
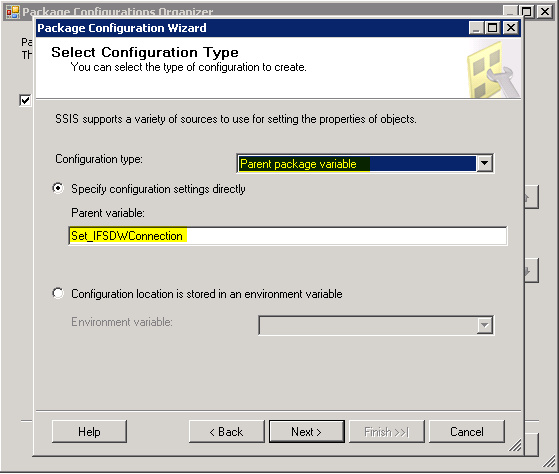
In Package Configurations main package, set Configuration type to Parent Package Variable.
Set Parent variable to: Set_IFS_DW_Connection.
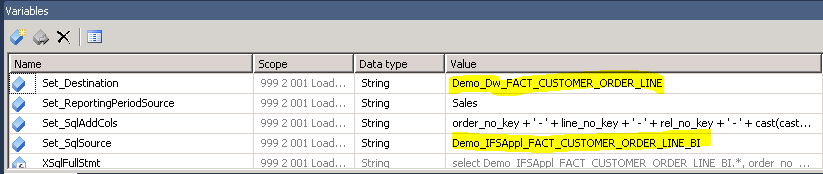
In Variables window set correct source and destination tables as well as Set_ReportingPeriodSource:

In Data Conversion Object Add correct DIM- ID’s and other ID’s.
Please the expression related to Company Reporting Period Id (DIM_COMP_RPD_ID).
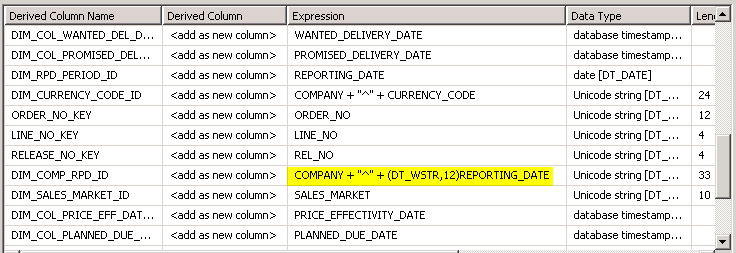
Make sure to include OBJID_NEW and OBJVERSION_NEW:
Here you also need to set properties in order to avoid truncation errors on
OBJVERSION_NEW using Advanced Editor (RMB).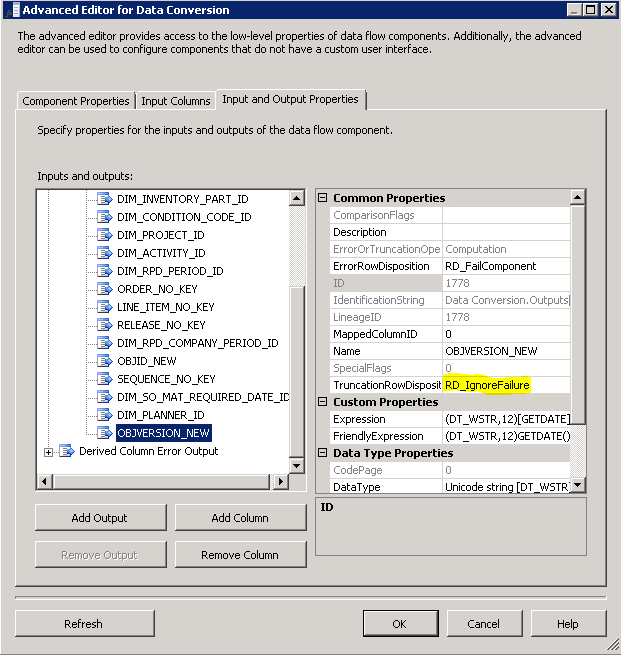
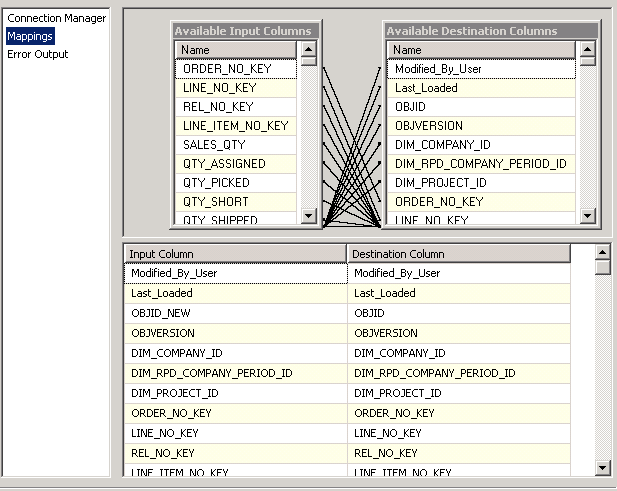
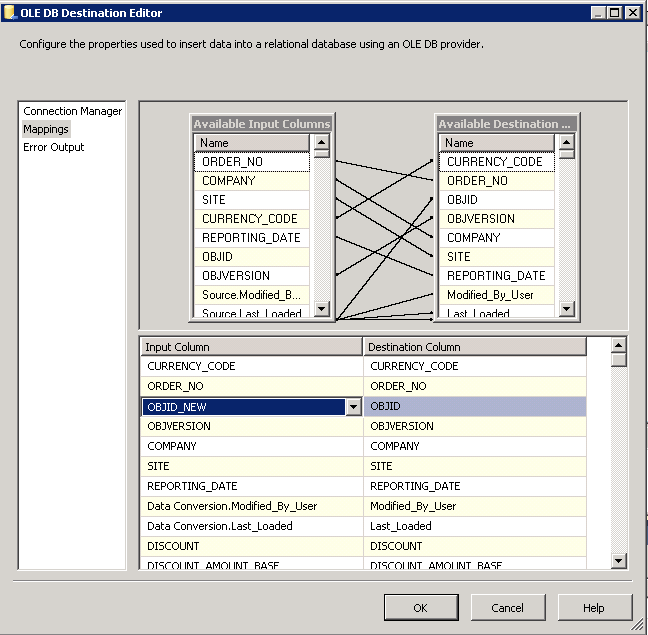
In Destination object, map OBJID_NEW to OBJID and OBJVERSION_NEW to OBJVERSION.
Map OBJID to OBJID_ORIG. Make sure that there all destination columns are mapped.
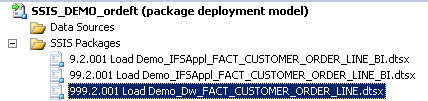
This package copies data from DEMO_IFSAppl-stage table to DEMO_Dw table.
Start with corresponding 2.2.* package.
Rename to 999.2.*** Load Demo_Dw_FACT…
In Package Configurations, set Configuration
type to Parent package variable.
Set the parent variable to: Set_IFS_DW_Connection.
Change Set_SqlSource and Set_SqlDestination in Variables window to Demo table names.
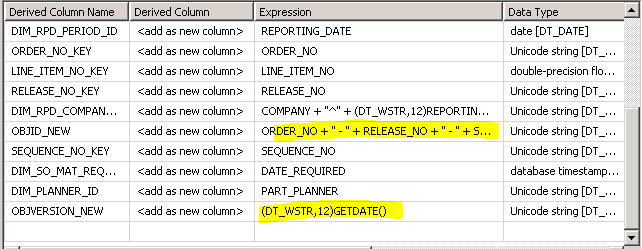
In Data Conversion component add a new Column called OBJID_NEW, containing the prefix DEMO^ berore the OBJID. This is done in order to be able to separate demo data from ordinary data in the Dm-table later on.

Expression is
"DEMO^" + OBJID
Map OBJID_NEW to OBJID in Destination component.

Check Data Flow so that there are no errors, especially mappings in Destination object.
This package copies data from DEMO_Dw table to ordinary Dm table
Start with Corresponding 3.2 package.
Rename the package.
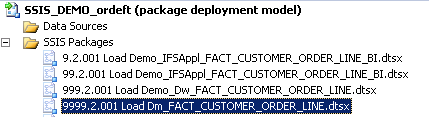
In Variables window change Set_SqlSource to read from Demo_Dw-table:
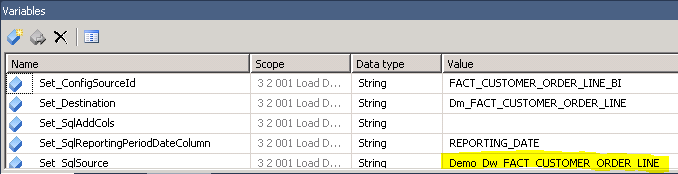
Destination table (Set_Destination) should remain as ordinary Dm-table.
In Package Configurations, set Configuration type to Parent package pariable.
Set the parent variable to: Set_IFS_DW_Connection.
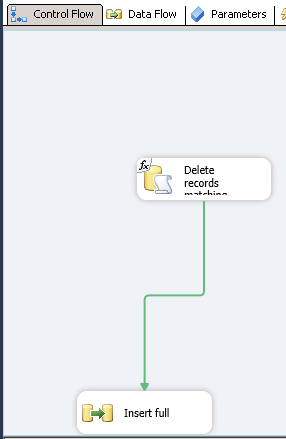
In Control flow, remove all components except Delete Records Matching and Insert full.
Connect the two remaining components.
In Data flow tab, check that there are no
errors in the component, especially in the mapping in
Destination component.
Disconnect and Reconnect components to Union All
Errors component.
Open and close Error Destination Component and make sure that connections are in place.
This the master package running all other packages after triggering from
Excel, i.e. packages that transfers data from Excel into the Cube.
Note: One D2* package per fact has to be created.
Copy package D9.2.010* from the purcft
component and paste into the SSIS project.

Rename the package to reflect the correct component. Take the number from the original package in the file system:
New Package Name

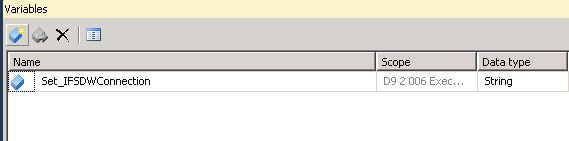
In Variables window, check that variable Set_IFS_DW_Connection has the the correct package name as scope.
Point to the correct Configuration file under SSIS\Package Configurations:
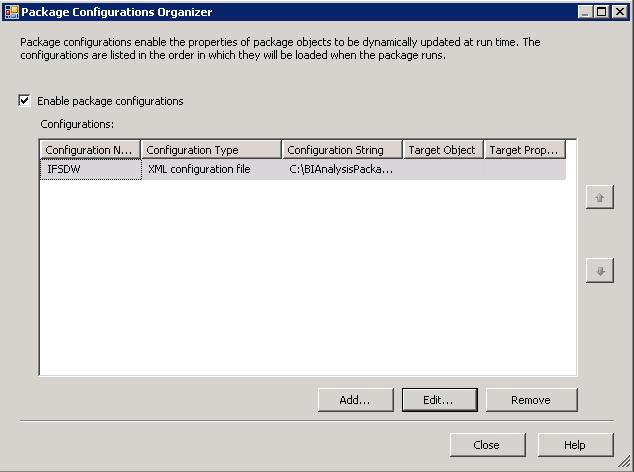
Press Edit and then Next
In the dialogue, browse to correct configuration file for IFSDW
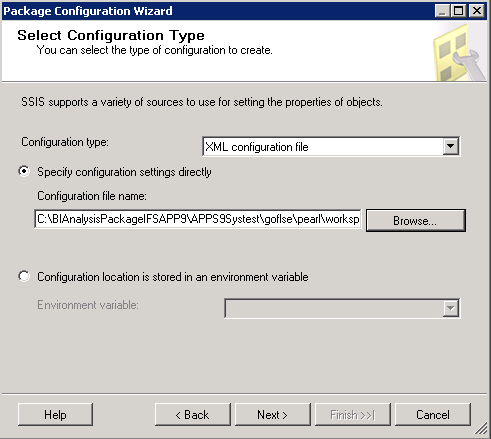
(This setting is configured by the installer when installing the solution into an environment)

Look at components Set_Status_Running and Set IFS DW Connection String. They are connected to first Sequence Container in Control Flow:
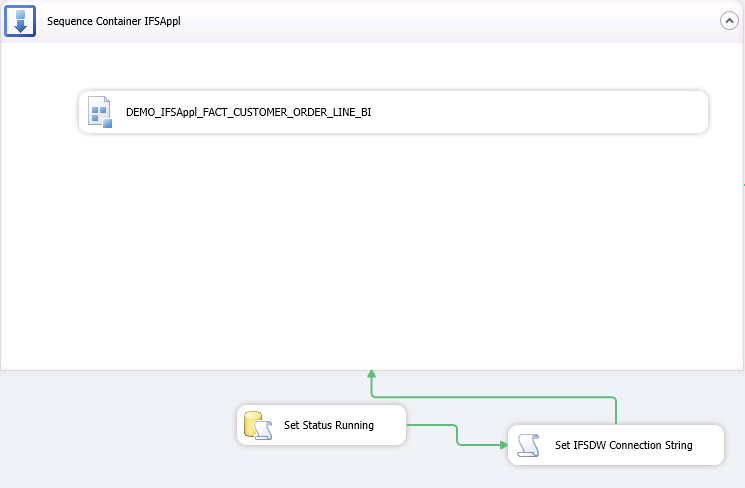
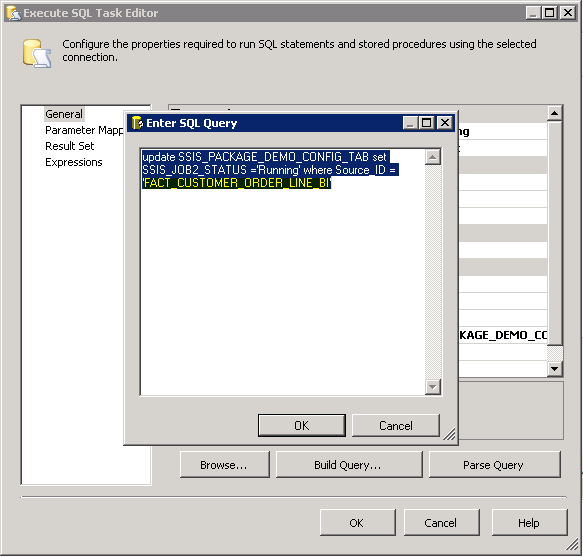
In Control Flow go to component Set Status Running. Change the component to update correct table:
Make sure that Set IFSDW component has the correct code.
Double click and
Press Edit Script. A new script window opens. At the bottom the variable is set
under //TODO Add your code here:
Otherwise the code can be copied from here:
// TODO: Add your code here

Dts.Variables["Set_IFSDWConnection"].Value =
ts.Connections["IFSDW"].ConnectionString;
Dts.TaskResult = (int)ScriptResults.Success;
Close the script window
Go to components Check Status Finished Component
and Check status Package error at the end of
the flow.
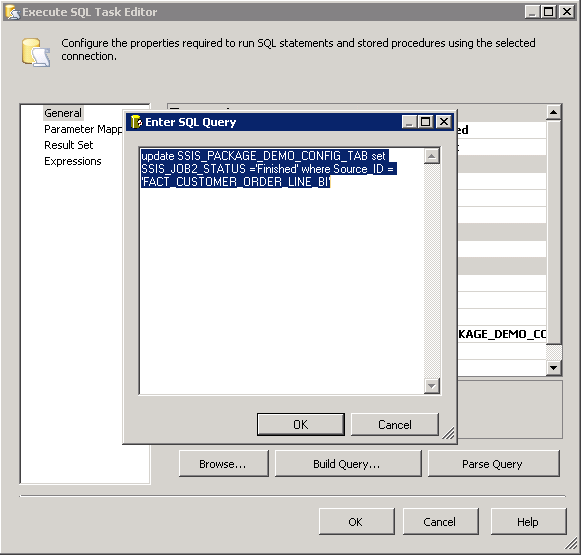
Change Set Status Finished Component to update
correct table:
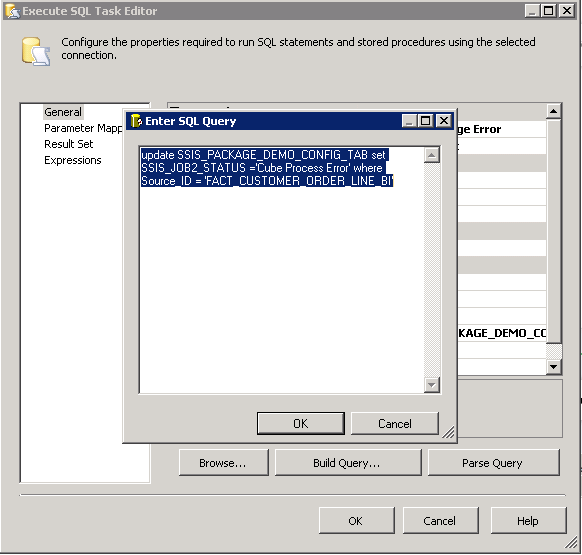
Do the same thing for component Set Status Package Error:
Change Names and connection Managers to point to correct SSIS packages.
Change Package Name under Properties:
Then change Package Connectors:
Double click on Connector and point to Correct packages

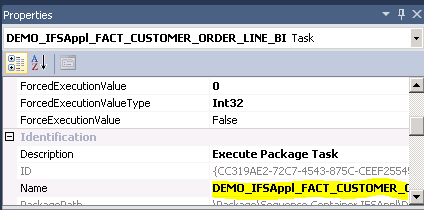
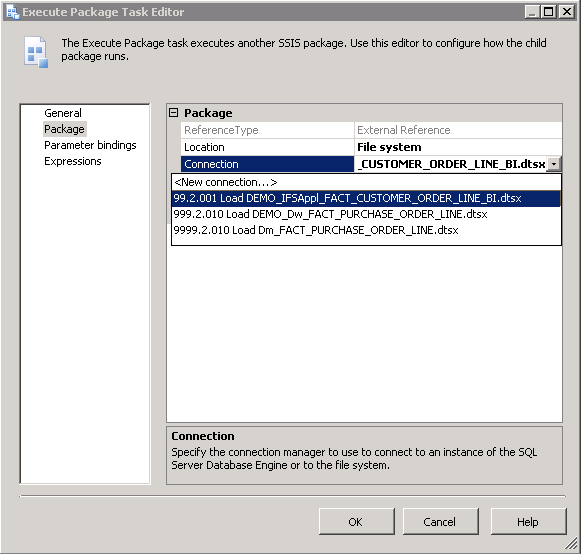
Change names on Execute Package Tasks:
Make sure that the Execute Package Task Editor points to the correct Connection:
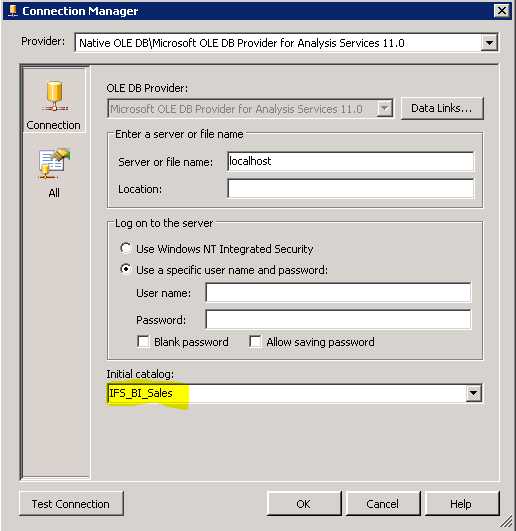
Change Name on Cube Connector
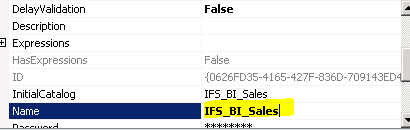
Change Connector Settings in Connection Editor:
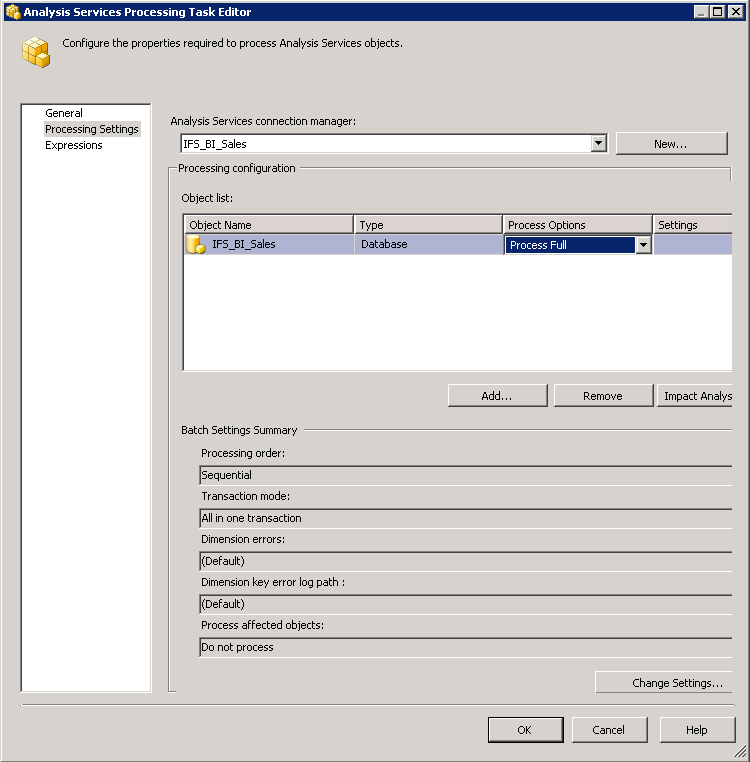
Change name to reflect cube name on Analysis Processing Task:
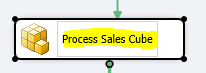
When editing Task, edit Object list, Remove Procurement Cube and add new cube and dimensions:
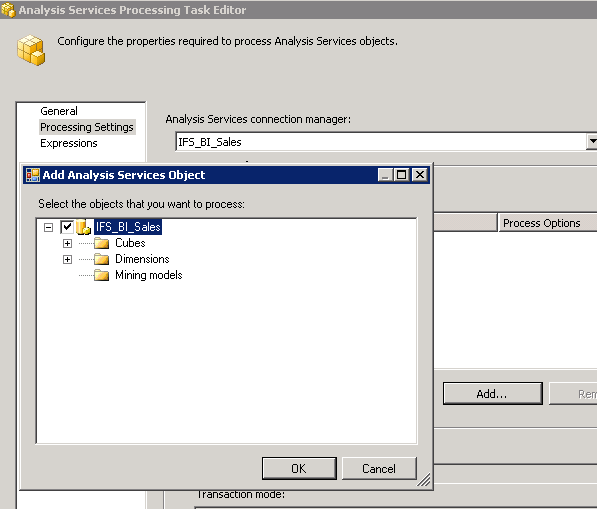
On processing option, set Option Process Full in order to make sure that the new lines are added.
Copy components Set Status Finished and
Set Status Package Error from purcft D9
package.
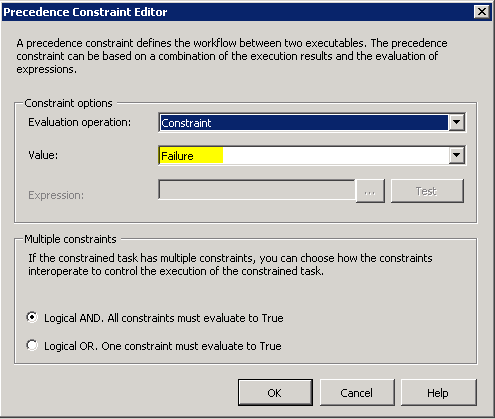
Connect them to Process Sales Cube Component with Success and Failure
Conditions:

Example Failure Condition below:
Change Set Status Finished Component to update correct table:
Do the same thing for component Set Status Package Error:
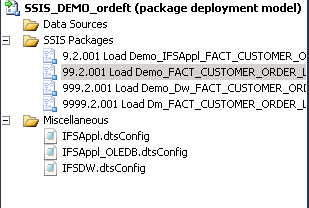
Go to Solution explorer.
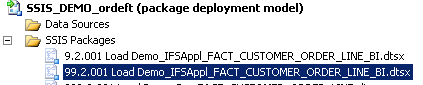
Delete any extra template packages that do not belong to the project.
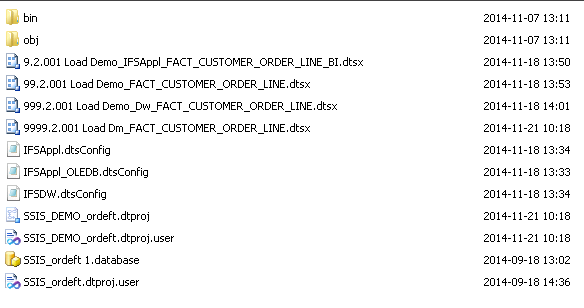
This is how it should look:
Double check also in the file system.
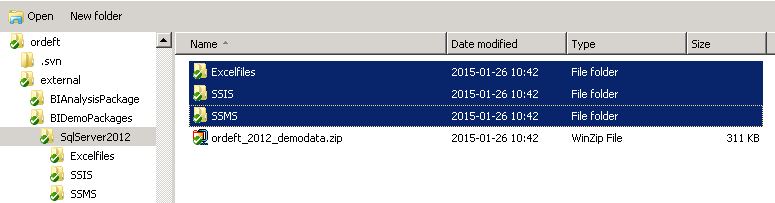
This is how it should look in the SSIS folder:
Mark the folders SSIS, SSMS and Excelfiles and create a zip file on the same
folder level.
Name should be <component>_<Sqlserver version>_demodata.zip.
Check in the components in SVN
