| Foundation1 / Administration Guide / Localization / Terms / Export Terms / |
This chapter describes how you can export terms. There are a number of different options when exporting terms, you can choose to export terms into aggregated XML files or as a single file. You can also export translations for all active languages or specify which languages you'd like to export the translations for.
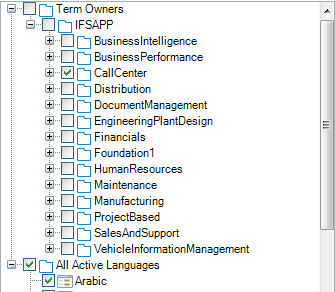
You can choose to export all the terms in the application or pinpoint the exact owner that holds the terms you want to export. This is done by selecting the check boxes in the Term Owners tree, see figure below.

Figure 1. This picture shows how you can choose to export terms for selected owners.
Note: If you select the topmost check box all terms will be exported.
The default scenario is to export summarized files, i.e. all terms for each owner are stored in the same XML file. You can decide to export aggregated files by making sure that the Aggregated Files check box is selected (see figure below). You can also identify if terms in state Preliminary or Obsolete should be included in the term export or not, this is done by selecting the Export Preliminary Terms or the Export Obsolete Terms check boxes.

Figure 2. The export settings, in this scenario will generate summarized term files and translations for all active languages. The export also includes preliminary and obsolete terms.
In order to start the export just click on the Export... button. You will be prompted with a dialog where you shall select the top folder of your local term structure. All summarized term files will be named according to the term owner with a "_terms" suffix, e.g. Cussch_terms.xml. The files that hold the translation data of the term will be located in a separate sub folder. The translation file is named according to the owner and the language code, e.g. Cussch_ja-JP.xml for the Japanese language. Translations for term usages will be exported in a separate file with a usage suffix, e.g. Cussch_usage_ja-JP.xml
It is possible to export single term XML files. This is easily done by clearing the Aggregated Files check box (see figure 2). In this mode there will be one XML file for each term.
In order to start the export just click on the Export... button. You will be prompted with a dialog where you shall select the top folder of your local term structure. All term files will be named according to the term identifier e.g. CustomerScheduleStatus.xml. The files that holds the translation data of the term will be located in a separate sub folder. The term translation file is named according to the term identifier and the language code, e.g. CustomerScheduleStatus_ja-JP.xml for the Japanese language. Term usage translations will be exported in a separate file with a usage suffix, e.g. CustomerScheduleStatus_usage_ja-JP.xml
There is also an option to export only the terms or the term translations. You can even select if you want to export translations for term or term usages separately. This is done by selecting one of the check boxes above Term Owner.

Figure 3. The figure above displays the options for a stand alone export of terms or translations.
You have an option to include the source text for term and usage translations. This is done by selecting the Export Source Text check box. The source text will be added as an extra element for each translations in the xml files.
At import time, the source text of the imported record will be verified against any existing terms and usage translations. If the source text differs and the translation record already exists, the record will not not be imported. If the source text differs but no translations exist, the record will be imported in a revised state. Records with matching source texts are imported as normal.